Overview
All the Spira artifacts follow a certain URL syntax that can be used to access the specific artifact item assuming the user is part of the project and has the right permissions to view it.
The generic format consists of the following elements separated by the delimiter "/" after the protocol syntax. The final string is appended with the .aspx after the Artifact Item.
| Element | Example |
| Protocol | http:// |
| Domain | champions.spiraservice.net |
| Project ID | 1 |
| Artifact Type | Incident |
| Item | 4 |
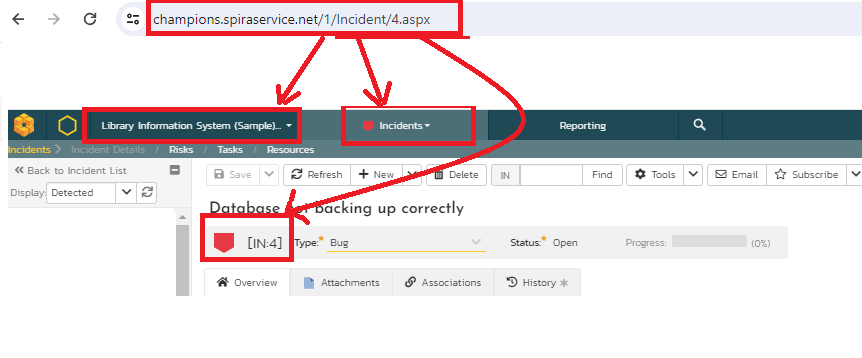
So, if Library Information Systems is having a Project ID = 1 and we are looking for Incident #4, then the URL would look like the following:
https://champions.spiraservice.net/1/Incident/4.aspx
Illustration
- In the following diagram, you can see that the Library Information Systems is associated with the PR1 (Project ID = 1)

- In the following diagram showing Incident #4, you can see that the URL string is constructed as explained before.
- Note that the browser (Chrome used here) is hiding the protocol (https://) but is required depending upon whether you have unsecured access (http) or secured access (https).

Option #1
SQL Query
Given below is the example query just to construct this URL. To confirm that the right project id and incident id were brought, these additional fields are also included in the where clause.
select
  R.PROJECT_ID,
  R.INCIDENT_ID,
 ("https://champions.spiraservice.net/" +
  Cast (R.PROJECT_ID as Edm.String) +
  "/Incident/" +
  Cast(R.INCIDENT_ID as Edm.String) +
  ".aspx") as URL
from
  SpiraTestEntities.R_Incidents as R
where
  R.PROJECT_ID = ${ProjectId} and
  R.IS_DELETED = False
Query Explanation
- The Project ID and Incident ID here are numeric. They have to be cast to String by using Cast and Edm.String datatype.
- The resulting strings are concatenated using the + operator.
- The final constructed string is given a name URL
- The IS_DELETED = False includes only valid incidents that are not deleted
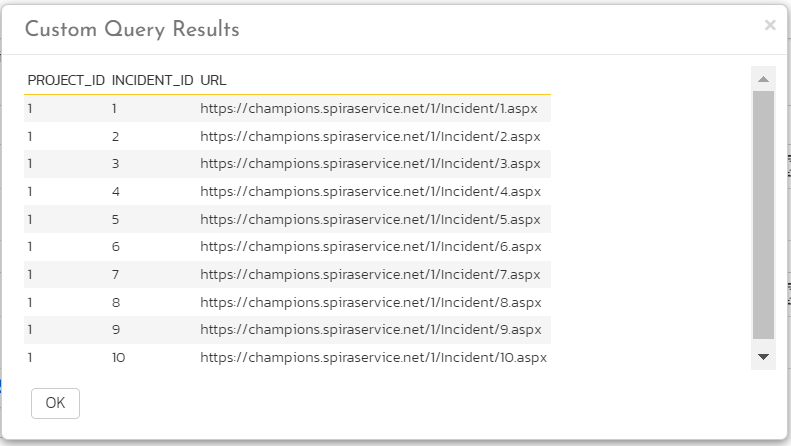
Preview Output
Given below is the output showing the resulting URL string.

XSLT Report Configuration
While the above display works, often, people want to see the an abbreviated clickable link instead of the URL itself. This requires some XSLT transformation on the default template.
<?xml version="1.0" encoding="utf-8"?>
<xsl:stylesheet version="1.0" xmlns:xsl="http://www.w3.org/1999/XSL/Transform" xmlns:msxsl="urn:schemas-microsoft-com:xslt" exclude-result-prefixes="msxsl">
  <xsl:template match="/RESULTS">
    <table class="DataGrid"><tr><th>PROJECT_ID</th><th>INCIDENT_ID</th><th>URL</th><th>Clickable Link</th></tr>
      <xsl:for-each select="ROW">
        <tr><td><xsl:value-of select="PROJECT_ID"/></td>
	     <td><xsl:value-of select="INCIDENT_ID"/></td>
	     <td><xsl:value-of select="URL"/></td>
              <td><xsl:variable name="link" select="URL"/>
                 <a href="{$link}" target="_blank">View IN-<xsl:value-of select="INCIDENT_ID"/></a></td>
              </tr>
      </xsl:for-each>
        </table>
    </xsl:template>
</xsl:stylesheet>
XSLT Explanation
- The lines 10 and 11 apply the required transformation to the fourth column we have added to the three columns already brought from the SQL Query.
- Since HTML anchor tags have three components, the link, the browser window to open, and the name of the link, we have defined a variable link defined in 10 that constructs the HTML anchor href based on the URL we have already computed.
- The line 11 expands on this href along with the target to open the link in a new browser window (target = "_blank") and the abbreviated link name (View IN- prefix followed by the INCIDENT-ID).
Report Output
Given below is the report output. Clicking on View IN-1 will open the Incident #1 in the Library Information Systems Project #1 as we have explained before.
- Please note that an active user session must be present for this action and if the session is no longer active, you will be required to login.
- The prefix (View IN-) can be changed but please note that empty white spaces are not always treated well by browsers and so it is recommended to have some non-white space characters as a prefix.

Option #2
The other option is to retrieve the attachments for the incidents you have just pulled.
To make report usage more comfortable for use and quickly open the attachment files for review, we keep fine-tuning an existing query and XSLT template.
In this case, we would like to pull the name of the incidents and the filename of the attachments associated with each incident.
select
  INC.PROJECT_ID,
  INC.INCIDENT_ID,
  INC.NAME AS INCIDENT_NAME,
 ("https://champions.spiraservice.net/" + Cast (INC.PROJECT_ID as Edm.String) + "/Incident/" +
  Cast(INC.INCIDENT_ID as Edm.String) + ".aspx") as IncidentURL,
("https://champions.spiraservice.net/" + Cast (INC.PROJECT_ID as Edm.String) + "/Attachment/" +
  Cast(AA.ATTACHMENT_ID as Edm.String) + ".aspx") as AttachmentFileURL,
ATS.FILENAME
from
  SpiraTestEntities.R_Incidents as INC
INNER JOIN SpiraTestEntities.R_ARTIFACTATTACHMENTS AS AA ON INC.INCIDENT_ID = AA.ARTIFACT_ID
INNER JOIN SpiraTestEntities.R_ATTACHMENTS AS ATS ON AA.ATTACHMENT_ID = ATS.ATTACHMENT_ID
where
INC.PROJECT_ID = ${ProjectId}  AND AA.ARTIFACT_TYPE_ID = 3 AND
INC.IS_DELETED = False AND INC.IS_ATTACHMENTS = true
In this version of the initial query we added a second block of building the URL for files, so to make it as a clickable link:
("https://champions.spiraservice.net/" +
  Cast (INC.PROJECT_ID as Edm.String) +
  "/Attachment/" +
  Cast(AA.ATTACHMENT_ID as Edm.String) +
  ".aspx") as AttachmentFileURL
In the first INNER JOIN operation we’re making sure that we’re selecting the right attachment, based on INCIDENT_ID. However, we need to apply filter to make sure that the right type of attachment is being selected. You’re free to choose how to name it (here it is an AttachmentFileURL).
In this example, in WHERE statement AT.ARTIFACT_TYPE_ID = 3 checks that the artifact we’re pulling attachments for is Incident (artifact_type_id = 3 for incidents), so to avoid mixing up with other artifact types that might have same ID (each artifact can have same ID but different typeID - see here for available types of artifacts).
For above described case here is the XSLT ready to use:
<?xml version="1.0" encoding="utf-8"?>
<xsl:stylesheet version="1.0" xmlns:xsl="http://www.w3.org/1999/XSL/Transform" xmlns:msxsl="urn:schemas-microsoft-com:xslt" exclude-result-prefixes="msxsl">
  <xsl:template match="/RESULTS">
    <table class="DataGrid">
      <tr>
        <th>PROJECT_ID</th>
        <th>INCIDENT_ID</th>
        <th>INCIDENT_NAME</th>
        <th>FILENAME</th>
      </tr>
      <xsl:for-each select="ROW">
        <tr>
          <td><xsl:value-of select="PROJECT_ID"/>
      </td>
      <td>
        <xsl:value-of select="INCIDENT_ID"/>
      </td>
      <td><xsl:variable name="link" select="IncidentURL"/>
                 <a href="{$link}" target="_blank"><xsl:value-of select="INCIDENT_NAME"/></a></td>
      <td><xsl:variable name="link" select="AttachmentFileURL"/>
                 <a href="{$link}" target="_blank"><xsl:value-of select="FILENAME"/></a></td>
        </tr>
      </xsl:for-each>
        </table>
    </xsl:template>
</xsl:stylesheet>
In this version, the URL generated is not visible in final result anymore and the generated link will be attached to the artifact and its attachment name.
Click Save twice and now the report is ready to use.
The result of query execution should be similar to the:
